How to integrate Microsoft Cognitive Services with C# in less than 60 minutes

The Microsoft Cognitive Services ecosystem is rich with various APIs that allow you to leverage complex AI algorithms for vision, text, speech and much more.
In a previous post, I detailed the process of building a LUIS Application using the Cognitive Services Dashboard.
I recently integrated LUIS with an existing Windows Service I built and in this post, I document the key steps and a pattern you can follow to easily implement Cognitive Services within your existing stack.
Connecting to the endpoint
If you followed my last post, you’ll be aware that when published, your service exposed as REST API. Prior to integrating .NET code with a REST API, I normally test REST endpoints using Postman to confirm they’re active and returning expected data.
You can see a sample of this in the screenshot below and the parameters the REST endpoint expects. The JSON response is also included.

Invoking the service using C#
To invoke the REST endpoint using C#, you can create an instance the HttpClientclass.
This class allows you to issue an asynchronous GET request, and as you’d expect, it returns an HttpResponseMessage which contains the JSON results returned by the Cognitive Service.
In the following code snippet, you can see an asynchronous method that’s responsible for invoking LUIS and returning a decimal number. If you’re not familiar with the Task Type and await command, then you can read up those here (it basically helps you deal with network latency).
public async Task<decimal> ProcessViaCognitiveServices(MyObj myQuery)
{
  var client = new HttpClient();

  // Request headers
  client.DefaultRequestHeaders.Add("Ocp-Apim-Subscription-Key", "<SUB_KEY");

  var uri = "https://westus.api.cognitive.microsoft.com/luis/v2.0/apps/APP_ID?" + "subscription-       key=<SUBKEY>&timezoneOffset=0&verbose=true&q=I’d love a new car";

  HttpResponseMessage response = await client.GetAsync(uri);
  var result = await response.Content.ReadAsStringAsync();

  // parse the response
  JObject o = JObject.Parse(result);

  string mainIntent = o.SelectToken("topScoringIntent.intent").ToString();
  string score = o.SelectToken("topScoringIntent.score").ToString();

  myQuery.ProbabilitySalesLead = 0;

  if (mainIntent.ToLower() == "sales lead")
  {
    return decimal.Parse(score);
  }

  return 0;
}
Parsing the response
When working with any of the Cognitive Services APIS (or any REST APIs for that matter), you’ll be dealing with lots of JSON like this:

The JSON Visualizer in Visual Studio lets you hone in on the attributes that you’re interested in quickly, using it you can expand each node and copy the path to each value.
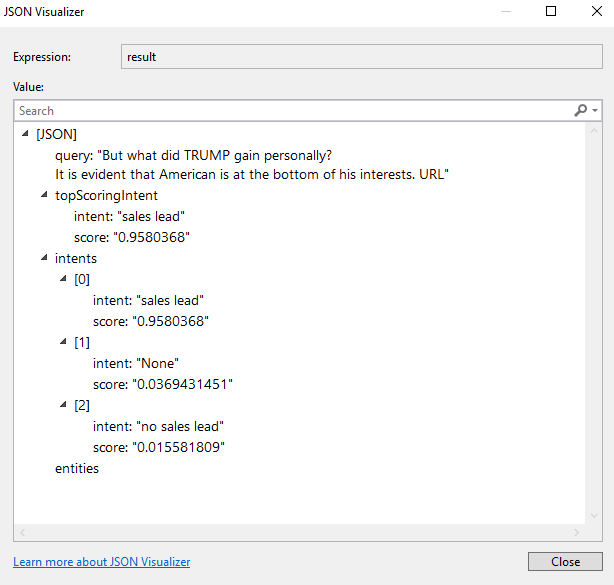
You can copy the path by right clicking on the node you’re interested in, then select Copy Path from the context menu. With the path in the clipboard, you can then write C# to extract the value like this:
JObject o = JObject.Parse(result);
string mainIntent = o.SelectToken("topScoringIntent.intent").ToString();
So how do you invoke this method from another class?
Just like any other! In the code snippet below, you can see how this gets invoked:
Task<decimal> processed = _myObj.ProcessViaCognitiveServices(myQuery);
The variable processed will contain a property Result, it’s this property that contains the decimal value returned from the REST endpoint over the web:
decimal retVal = processed.Result;
Pricing
You only get 1,000 free hits a month with the LUIS service, after that you need to pay. The last time I crunched the numbers, it was going to cost approximately £6.00 for every 10,000 hits. Not too expensive but if you need to process enterprise datasets or social data then it’s something to consider.
Finally
In this post, I’ve covered how to connect to one of the Microsoft Cognitive Services and pattern for integrating it with your existing .NET applications. Of course, there will be other approaches but it’s quick and practical and it’s one that’s worked well for me in the past.
-=-
Jamie Maguire is a Software Architect with nearly 20 years’ experience architecting and building solutions using the .NET stack. For more of Jamie’s articles, be sure to check out his website.

