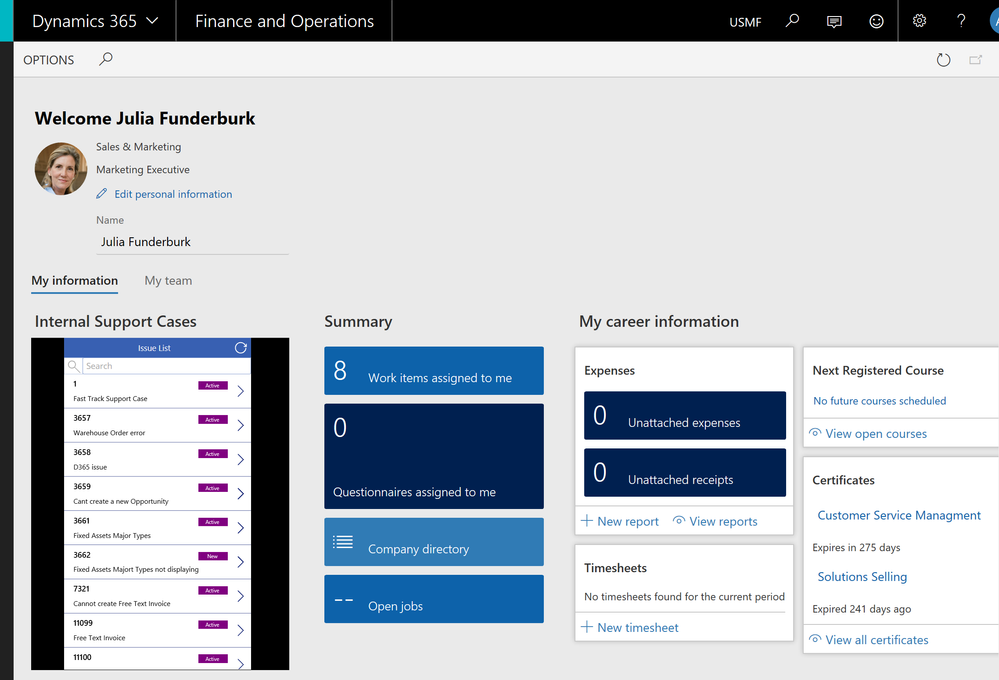
Scenario 1: Track your internal support tickets within Finance and Operations
In Dynamics 365 for Finance and Operations, end users have the capability to submit support tickets directly from the client interface. Once the issue is submitted, there is no visibility of what’s happening or who is working on this issue, as the case is managed in Visual Studio Team Services (now called Azure DevOps) until resolution. Learn more about Setting up and using support functionality in Finance and Operations here.
This scenario is more relevant during UAT phase where end users are continuously testing the application and opening support cases for all the issues found. It would save a lot of time for end users it they’re able to view the status of their support tickets right within Finance and Operations to perform further testing.
With PowerApps, you can create an app which can read all the issues and capture relevant information from VSTS/Azure DevOps. By embedding this PowerApp into Finance and Operations, you can give the end users more visibility into status of their support tickets. Read more about Embedding PowerApps into Finance and Operations here.
To see the end to end scenario, watch the video:
Prerequisites:
- Add all Finance and Operations users in VSTS (Stakeholder access if just adding them for this purpose. Stakeholders can be assigned to unlimited users for free) .
- In VSTS/Azure DevOps project, create a new query to list all the work items that the generated from Finance and Operations client.
- Click on this link to download the PowerApp package to your local computer
- In PowerApps, create a connection to your VSTS/Azure DevOps instance
Steps:
- Sign into PowerApps and in the left pane, click on Apps and select Import Package
- Upload the PowerApp package which was saved on your computer as a prerequisite
- When the upload is complete, you’ll find that the package contains, 2 Flows, 1 App and a connection to VSTS/Azure DevOps
4. Select “Create as new” under Import Setup for the App and both the Flows. Select the connection created for VSTS/Azure DevOps. This enables the Import option to start importing the App.
5. Click on Import to import the PowerApp and the related components.
6. Editing the Flows: In the left pane, click on Flows under Business Logic section to find 2 newly created flows called Get query results and Get work item details
- Edit Get query results flow to select the right Account name, Project Name and Query Id (Created as prerequisite) in the VSTS/Azure Devops action section and Save the Flow.
- Edit Get work item details to select the right Account name and Project Name in the VSTS/Azure DevOps action section and Save the Flow.
7. In the left pane, click on Apps to find the newly created PowerApp called Internal Support Mobile. Run the App to make sure the app can load the VSTS/Azure DevOps workitems successfully. Click on the App details to note down/copy the App ID (GUID like: 7667970f-0bea-4454-605c-0113testef41)
8. Share the App with all Finance and operations users (Permission set to: Can use).
9. In Finance and Operations, open the workspace or form where you’d like to embed the PowerApp. For example, Employee Self Service workspace. Click on Options > Personalize this Form. Click on Insert > PowerApps and select the location where you’d like your App to be embedded. This opens a window for you to key in relevant App details (Name, App ID (From step 7) and App size (Thin)) and click on Insert to complete the embedding.
10. Refresh the browser to see the embedded PowerApp and enjoy!
Note: This app currently uses 2 Flows to fetch data from VSTS/AZURE DEVOPS into the App. This is due to current limitations with VSTS/ AZURE DEVOPS connector in PowerApps.


