Advanced | Flow of the Week: Triage and Team Assignment with Microsoft Flow
Triage and Team Assignment Flow
Whats up Flow Friends!
This post is written by George Culler and Brian Osgood from the Azure team. They Contacted me and asked to show me a set of Flows they had made for their team and after seeing this all in action, i asked them to share the post with all of you, as i know we can all use this same concept in many ways!
Anyways, onward and Enjoy!
Overview:
Hi, Flow Community!
We are excited to share a customized Triaging and Team Assignment Flow which will help speed up your teams processing times and ensure more accurate work.
We built this Flow out of a need to quickly triage to the right teammate and check for errors in tickets coming from a much larger customer facing team. Below we will show you the steps taken to run Flow through five different checks, as well as send TFS tickets to the right team member for processing. This Flow allows your organization to cut down on churn between teams, provide more accurate information and overall improve customer experience. It will be assumed that you have a understanding of how Flow works so we are going to dive right into creation.
Prereqs:
- Basic Expression Function Knowledge
- Advanced Flow Knowledge
- SharePoint list creation
- Intermediate TFS / DevOps Knowledge
Steps:
Create a new Flow with a DevOps “When Work Item is Created” trigger
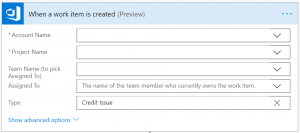
Fill in your required fields and select your work item type. For our Flow, we are using our in-house “Credit Issue” work item. (this helps the Flow pull the correct data fields if you have multiple work items)
We are going to be checking for five “pain points” on each work item. These five points are:
- Date issue reported; we have a requirement that issues be reported within a certain amount of days since service start.
- Is a file attached? We require that a calculation file be attached to some issues so we will need to check the issue category and then check a field for its value.
- Is this Issue a duplicate category for the same customer? We have a couple of one time use categories that we need to check aren’t given multiple times.
- Is the dollar amount below a certain threshold? If so, it should be marked by the creator as Pre-Approved.
- Auto calculate the dollar amount based on the exchange rate.
We will be running our checks in parallel so let’s add some parallel conditions and get this Flow started!
Date Reported:
Starting with a condition action, we will use the dynamic content to pull in the “Date Issue Reported” field. Our conditional statement will check if the field is blank. We used an expression for this with the “empty” function.
empty(triggerBody()?[‘fields’]?[‘Ops_DateIssuewasReported’])
This function returns true if the field is empty. If its empty, we tag it as “BOT: NODATE”. If the field is populated, we will perform some date calculations to check if the reported time is within 120 days of the Date Issue Started. Using the “Date Time” connector and the “Add to Time” action. We can add 120 days to the Date Issue Began field.


We now have two Dynamic date values we can use, but to compare the date difference, we will use another expression function, the “Ticks” function which we can use in a conditional action to compare if our date issue started + 120 days is greater than the date issue was reported.
ticks(triggerBody()?[‘fields’]?[‘Ops_DateIssuewasReported’])
ticks(body(‘120_Day_Addition‘))

If the condition results in a “Yes” then we will tag the ticket as “BOT: 120Days” and leave a message in the Bot Box (this is a field we have added to our TFS template that automatically displays a message when a ticket is created incorrectly). If the condition results in a “No” we do nothing as the ticket is within our criteria.
Calc. file check:
Currently, our check for the file is dependent on if the creator has marked “No” in a dropdown. If so, we tag it “BOT: CF” and then update our custom “Bot Box” to have a message.

![]()
![]()
Empowerment Check:
For this branch, we will use our SharePoint connector to pull from a custom list. We add a SharePoint action “Get Items” and add our site address and select our List Name. This will return an array that we need to iterate through using the “Apply to Each” action on the “value” dynamic variable from our “Get Items”.

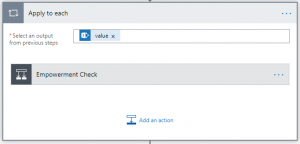
We then run a condition on the ticket item checking for criteria, if its marked correctly, and what the dollar amount is in USD.
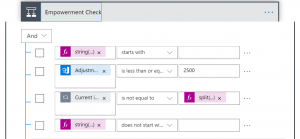
If the condition returns a “Yes” we tag the ticket with “BOT: EMP” and leave a message in the Bot Box. We played with the idea of re-assigning the ticket to the creator but that would cause too many headaches for the small amount of time we might save.
Duplicate scenarios:
Since we have three, one time use categories, we need to make sure we are not giving a customer more than once, however we have thousands of customer’s so we cannot just go look over every customer’s request and find certain categories every time. We built a custom query in TFS to pull all tickets where we approved a refund in those categories within the last two months. We then used the DevOps connector “Get Query Results” action to find our custom query and pulled from it.

This returns an array, so we need to use the “apply to each” action again. Inside the “apply to each” we need get the details of each ticket. For this we use the DevOps “Get Work Item Details”. After we have the details, we run a condition, this checks if the customer number on the new ticket is equal to the customer number in an old ticket and if the category is the same for that ticket.
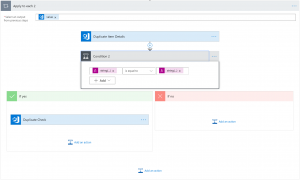
If the conditions are met, we update the ticket, and you get one guess on what we do to the ticket… did you say, “Tag it”? Congrats, we tag it!
Currency Calculation:
This one was tricky to do and involves A LOT of string parsing and variable initialization. Here is the branch overview.
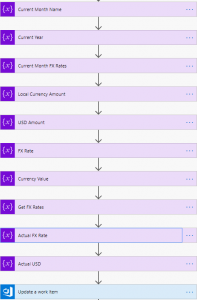
We won’t go through all the individual variables, but I will go over the FX Rate (Exchange Rate) and how we pull from a list and parse the value out. Inside of DevOps, we have a tab that is manually updated by the finance group. It is a long list of semicolon separated values for each of that month’s specific exchange rates for each currency. We will use the split expression function to split on a delimiter. The format of the list is:
USD-1; EUR-0.9;
So we need to split on the semicolon and then the dash. This is the expression we used.
float(split(split(split(variables(‘FX Rates For Current Month’),variables(‘currency value’))[1],’;’)[0],’-‘)[1])
It returns a float that corresponds to the currency that is used in the ticket and the month the ticket was created to then use for a local currency to USD calculation.
Once all the variables are created, we can update the TFS work item with our Tag, “BOT: FX”. All our branches are completed, if there are issues with any of these instances, they will be tagged for the team member to be made aware of and check.
So, let’s go to the final step.
Pre-Triage Tag:
Once all checks have been run, if the ticket passes all previous criteria it will get tagged as BOT: Triage. Signaling the system to send the ticket to its sister Flow where we triage tickets out to individual team members. First, we must determine that this is a new case and is not coming from certain teams already approved. To do this we will use the condition action. Setting the state of the ticket to only run when equal to new cases. Further, we consider certain other teams who are excluded from this action using the or function.
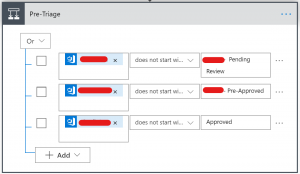
When the parameters for the condition have been set we use the update work item in Azure DevOps for both the yes and no condition trees. Both are, once again, only going to change the tags on the ticket which will later trigger the team triage process.
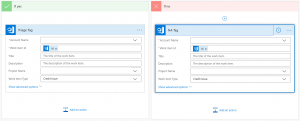
If the conditions are not met then the Flow will follow the no path and tag the ticket Bot: NA, this signals to the system that the appropriate conditions were not met and to not move forward with the triaging to team members.
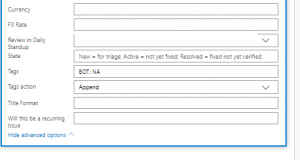
If the correct conditions are met it will mark the issue as Bot: Triage, which gives the go ahead to the system to send the ticket to the triage Flow and distribute to the appropriate team member.
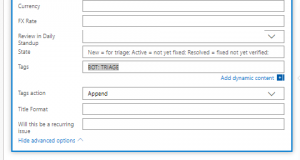
This is the end of our initial Flow, to recap, a ticket has been checked for our five initial problems and has been tagged as such to alert the team member of the problem. Further, if a TFS issue has met all the necessary criteria it is marked “Bot: Triage” signaling to the system it is ready to be sent to a team member.
Queue Triage:
This will be a separate Flow in which we take what was done in the previous Flow and distribute TFS tickets to individual team members. As a brief overview, this is what the formatting will look like when done correctly. Below we will dig into what all of this is doing and walk through the process.

First, we need to set up our trigger, we are using a scheduled recurrence to run this Flow. Every five minutes it will run and look for updated tickets with the necessary tag from our previous section. Once it sees a TFS ticket with the tag it will move on with the Flow.

We then built individual queries within TFS for each member of the team and the categories they own. A new feature within Azure Devops called “get query results” allows us to check these queries quickly and as team members come and go be more flexible.

When you have built your query, use the “apply to each” condition and select value as the output. This will allow you to access all data fields in the TFS query we have built.
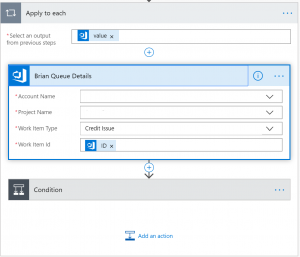
After we have identified the correct query, we will need to add a separate condition that ensures the issue was tagged by the pre-check Flow talked about earlier.
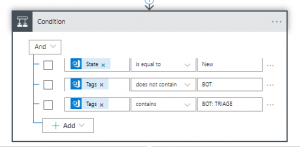
Once the update condition has been met, we once again need to use the “update work” item in Azure Devops. This will finally send the TFS ticket to the correct team member with the ticket checked for any of our known issues before being received.
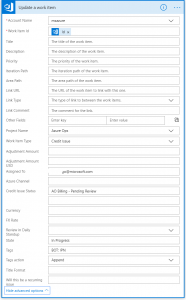
Conclusion:
Overall, Flow has helped us cut down our own triage processing times from over 6 hours to 1-2 minutes and given us the flexibility to focus on the core business projects.
We know this post will help you think differently about more creative ways Flow can be used to reduce manual work, speed up your business, and solve redundant problems you run into on a daily basis.
If you have any suggestions or questions, feel free to comment on this post.
We’d love to hear your feedback!
Brian and George


