
Fast Backup and Restore with File-snapshot Backup
SQL Server Data Files in Azure allows you to create databases in SQL Server running in on-premises or in a virtual machine with a dedicated durable location in Azure blob storage. As part of SQL 2016, we introduced File-Snapshot Backup, the ability to perform very fast backup and restore leveraging the Azure Blob Snapshot Technology.
What is File-Snapshot Backup?
In order to fully understand File-Snapshot backup we first need to get an understanding of Azure blob snapshots. An Azure blob snapshot is a read-only version of a blob taken at a point in time. As data in the blob changes over time, the snapshots continue to point to the data at the time when the snapshots were created.
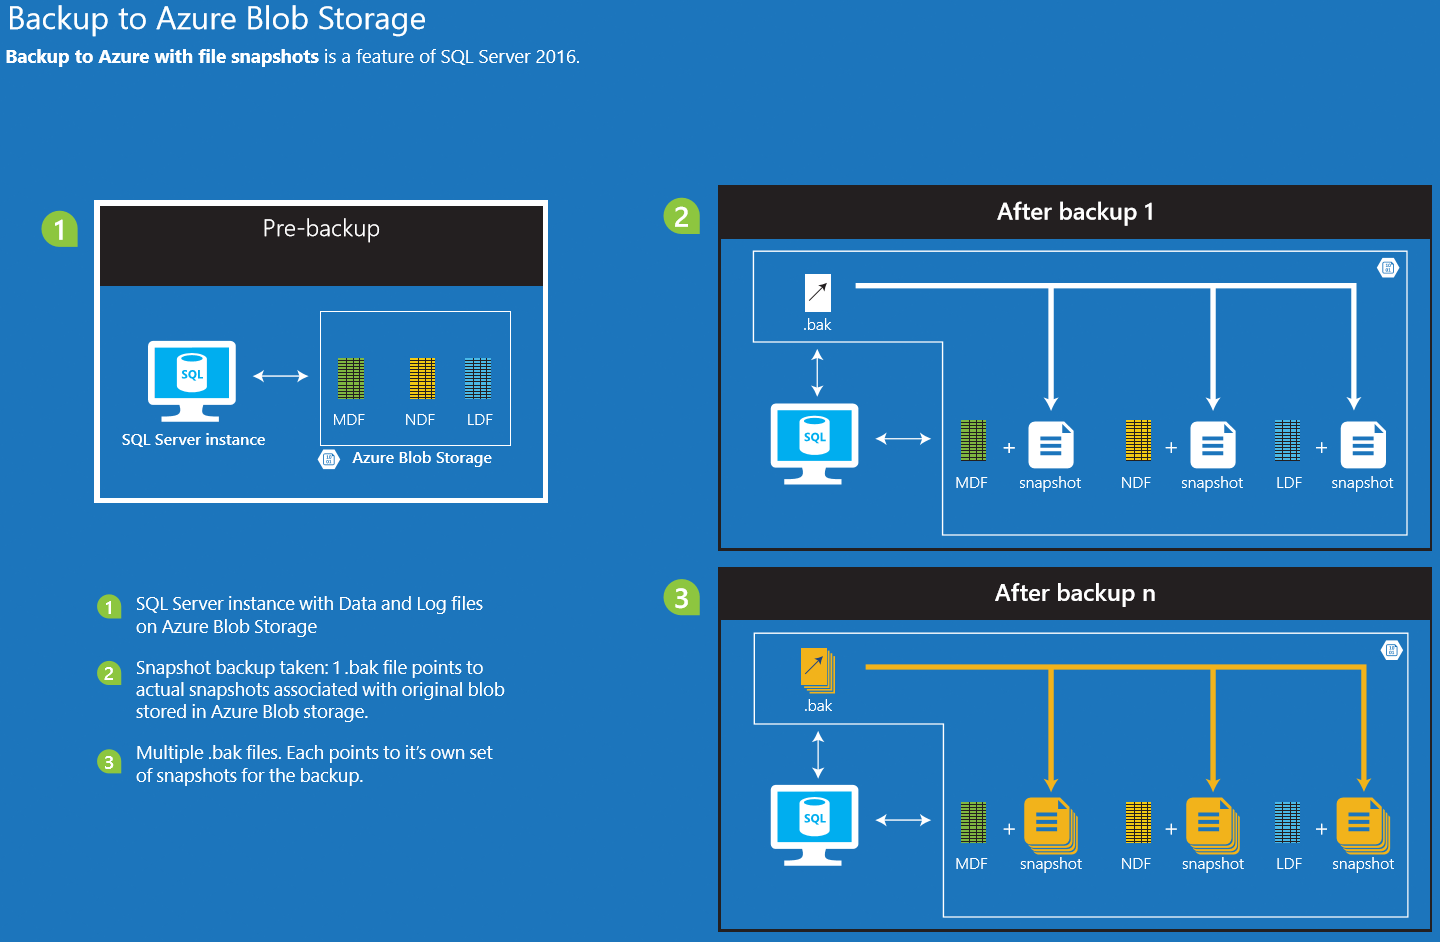
File-Snapshot backup consists of a set of Azure blob snapshots and a SQL backup file that contains pointers to those snapshots.
There are two types of File-Snapshot backups, full database backups and transaction log backups.
A full database backup creates a snapshot of each data and log file comprising the database and establishes the transaction log backup chain. Unlike tradition backups, a File-Snapshot backup does not copy all of the data in the database, it instead relies on the Azure storage service to snapshot the files. This makes the backup process extremely fast.
A transaction log backup creates a snapshot of each database file, records the location of the snapshots in the backup (.bak) file, and truncates the transaction log file. This is unlike traditional transaction log backups where only the transaction log file is captured in the backup.
How do I use File-Snapshot Backup?
The first thing you will need to do is set the recovery model to full and establish the transaction log backup chain with a full backup using File-Snapshot. Below is an example of setting the recovery model to full and creating the first full backup of the database.
— To set the recovery model to full.
USE master;
GO
ALTER DATABASE [MY_DATABASE_NAME]
SET RECOVERY FULL;
GO
— Create a full backup of the database.
BACKUP DATABASE [MY_DATABASE_NAME]
TO URL = ‘https://<mystorageaccountname>.blob.core.windows.net/<mycontainername>/<mydatabasename>.bak’
WITH FILE_SNAPSHOT;
GO
This full backup will create a snapshot of each data and log file, create a backup file with pointers to the snapshots, and establish the transaction log backup chain.
After the initial full backup, you only need to perform transaction log backups because each transaction log File-Snapshot backup set contains blob snapshots of all database files and can be used to perform a database restore or a log restore. Below is an example of creating a transaction log backup and appending the time to the file name.
— Back up the database log using a time stamp in the backup file name.
DECLARE @Log_Filename AS VARCHAR (300);
SET @Log_Filename = ‘https://<mystorageaccountname>.blob.core.windows.net/<mycontainername>/>/<mydatabasename>_Log_’+
REPLACE (REPLACE (REPLACE (CONVERT (VARCHAR (40), GETDATE (), 120), ‘-‘,’_’),’:’, ‘_’),’ ‘, ‘_’) + ‘.trn’;
BACKUP LOG [MY_DATABASE_NAME]
TO URL = @Log_Filename WITH FILE_SNAPSHOT;
GO
The capability of transaction log File-Snapshot backups to be used for a database restore eliminates the need for additional full or differential backups. This greatly simplifies your backup plan.
How do I restore File-Snapshot Backups?
With File-Snapshot backup you can restore to the end of a backup, or you can restore to a specific point in time. For both of these restore options you can use restore and replace or restore and move to a new database.
For restoring to the end of a backup you only need the File-Snapshot backup you want to restore to the end of. This will work for both full backups and transaction log backups. Below demonstrates restoring to the end of a transaction log File-Snapshot backup to a new database.
RESTORE DATABASE [MY_DATABASE_NAME] FROM URL = ‘https://<mystorageaccountname>.blob.core.windows.net/<mycontainername>/<mydatabasename>_2015_05_18_16_00_00.trn’
WITH RECOVERY,
MOVE mydatabasename_Data TO ‘https://<mystorageaccountname>.blob.core.windows.net/<mycontainername>/<newdatabasename>_Data.mdf’;
MOVE mydatabasename_Log TO ‘https://<mystorageaccountname>.blob.core.windows.net/<mycontainername>/<newdatabasename>_Log.ldf’;
GO
For restoring to a specific point in time, you will need the File-Snapshot backup before the point in time and the File-Snapshot backup after the point in time. Below demonstrates to restoring to May 18th, 2015 at 5:35 pm using two transaction log File-Snapshot backups overwriting the original database.
RESTORE DATABASE [MY_DATABASE_NAME] FROM URL = ‘https://<mystorageaccountname>.blob.core.windows.net/<mycontainername>/<mydatabasename>_2015_05_18_16_00_00.trn’
WITH NORECOVERY,REPLACE;
GO
RESTORE LOG [MY_DATABASE_NAME] FROM URL = ‘https://<mystorageaccountname>.blob.core.windows.net/<mycontainername>/<mydatabasename>_2015_05_18_18_00_00.trn’
WITH RECOVERY,STOPAT = ‘May 18, 2015 5:35 PM’;
GO
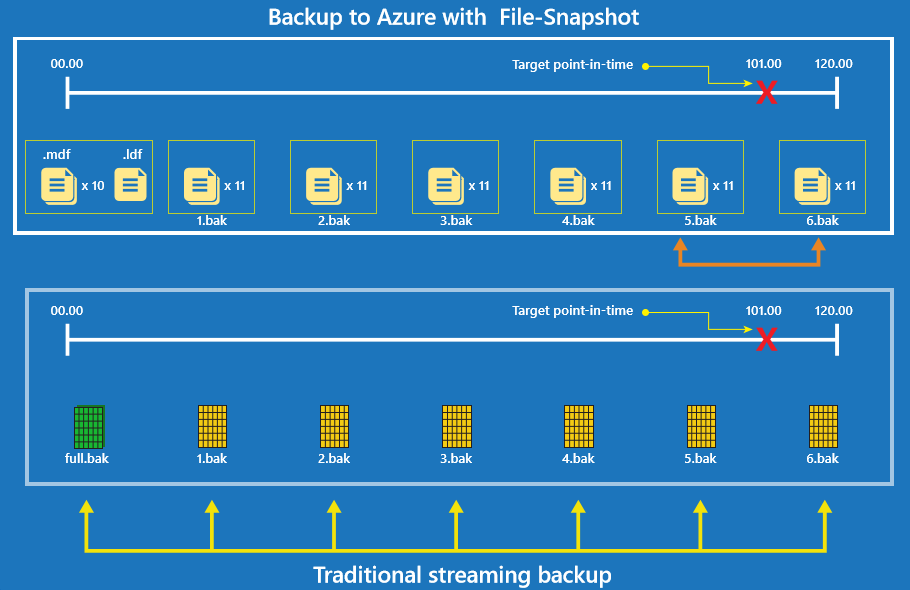
Unlike traditional point in time restore, where you need all the transaction log backups from the most recent full or differential backup before the point in time, File-Snapshot backup only requires the backup before the point in time, and the backup after the point in time. The image below illustrates what is required to restore to a place in the last log backup of a backup chain using traditional streaming backup versus using File-Snapshot backup. Note that difference in the number of backups required for File-Snapshot backup.
So really, how fast is it?
In the File-Snapshot Backup Channel 9 Video, the performance of point in time restore with File-Snapshot backup vs traditional streaming backup was compared. The demo environment consisted of the following:
- SQL Server running on a D13 VM in Azure with 8 CPU cores and 56 GB of memory.
- Database with 10 data files and one log file, all stored in Azure blob storage.
- A 1 GB table with three columns; int, datetime2, and binary(4000)
Next, 3.5 GB of data was generated over a two-hour period with log backups being take every 20 minutes. A point in time in the last (6th) backup file was restored to.
With traditional streaming backup the restore took over 30 minutes, while with File-Snapshot backup the restore took less than one minute. In this example, point in time restore with File-Snapshot was over 30x faster than traditional streaming backup.
How do I get started?
The best way to get started is to follow our tutorial on Using Azure Blob storage service with SQL Server 2016 databases. This will take you through the steps of creating a database with files stored directly on Azure blobs all the way to managing your File-Snapshot backups.
You also will want to check out the following:
