This content has been archived, and while it was correct at time of publication, it may no longer be accurate or reflect the current situation at Microsoft.
Enterprises are constantly challenged to better protect their data wherever it resides: on-premises and in the cloud. At Microsoft, we’ve adopted the Azure Information Protection scanner as our primary solution to automatically protect on-premises data stores. By combining the scanner with Office 365 Data Loss Prevention and Azure Information Protection, we’re providing end-to-end discovery, custom labeling, and automated protection of all sensitive data, irrespective of when it was created or where it is stored—even in PDFs and RMS-encrypted files.
Today’s digital world is seeing an explosion in connectivity, collaboration, and mobility. Customers expect to access information wherever they are, and with any device. Similarly, employees need to be able to access and share data to maximize productivity. This situation poses a huge challenge for IT organizations in the enterprise: how to promote the collaboration and data sharing that drive business insights while simultaneously protecting that same data?
As part of our ongoing digital transformation journey at Microsoft, we have been enhancing our digital security by implementing several security technologies that are available in Microsoft 365—our complete solution of integrated and intelligent components that includes Office 365, Windows, and Enterprise Mobility + Security. This technical case study describes one aspect of the Microsoft Core Services Engineering and Operations (CSEO, previously Microsoft IT) team’s efforts: utilizing Azure Information Protection scanner to automatically discover, classify, label, and even protect on-premises files that contain sensitive information.
Challenges with traditional on-premises information protection at Microsoft
As the company’s first and best customer, CSEO has a mandate to enable Microsoft to build the most trusted devices and services while keeping the company safe and our data protected. The scale of this task presents a significant challenge: Microsoft maintains a hybrid environment comprising many petabytes of information in Azure, plus hundreds more terabytes of data stored in on-premises file shares and SharePoint sites in regional datacenters. Like many large enterprises, we were struggling to protect the ever-increasing volume of data being generated around the globe that is stored in the cloud and locally. To properly protect it all, we needed to accurately identify the nature of the data in each file, classify the file accordingly, and then potentially take appropriate security measures (such as encryption) on files that contain sensitive information.
Although we had been using Office 365 Data Loss Prevention (DLP) to protect data in the cloud, and Azure Information Protection to label and encrypt new Microsoft Office files as they’re created, we didn’t have a robust solution to protect the data within files that were created before we started using Azure Information Protection, or in files stored locally in on-premises file shares and SharePoint sites. Our primary solution for scanning these on-premises files was a third-party product with limited functionality that was expensive to license and maintain. Its proprietary system didn’t integrate with Office 365 DLP or other Microsoft 365 technologies, so our analysts had to re-create the on-premises scanner’s logic to replicate the logic in our cloud-based Office 365 DLP solution. Inevitably, the different systems’ results would differ to some extent.
We needed to shift to a new data scanning solution that would integrate with our Microsoft 365 security technologies—one that could use the same logic already defined in Office 365 DLP. That would enable us to use the same information types to ensure consistent results between cloud-based and on-premises scans.
This solution also needed to automate as much of the information protection process as possible, optimally supporting additional capabilities beyond scanning, such as applying labels and encrypting files that were identified as containing sensitive information. This trio of functionality—discover, label, andprotect—would be key to enabling the security team to process the vast volumes of documents throughout the company’s on-premises data stores on an ongoing basis.
Implementing the Azure Information Protection scanner
CSEO uses the Azure Information Protection scanner, a component of Azure Information Protection, as our primary solution for on-premises file scanning—including PDFs and Rights Management Services (RMS)-encrypted files. Because Azure Information Protection scanner runs as a service on Windows Server, it’s efficient for bulk operations on data stores. We use it for automated discovering, labeling, and even encrypting files when merited.
The Azure Information Protection scanner is activated either by using Windows PowerShell or through its central reporting console. When activated, it scans a predefined list of data stores, looking in all files of specified types for sensitive information. We can also specify file types that won’t be scanned, such as .tmpor .dll. Files that contain data that match the scanner’s search parameters can be flagged in a logged report, tagged with a sensitivity label, or even encrypted automatically.
Deploying the Azure Information Protection scanner
We deploy and configure the Azure Information Protection scanner through the following steps:
- Deploy a Windows virtual machine (VM).
- Install a Microsoft SQL Server Express instance.
- Install the scanner into the VM.
- Run the configuration in PowerShell to define the storage repositories (such as which file shares to scan) and what actions to take (discover only, discover label, or discover label protect).
After the Azure Information Protection scanner is deployed, we can access its central reporting console (as depicted in Figure 1) to view the status of all deployed scanners, change their search parameters, start scans, and view scan results.

Azure Information Protection scanner operational strategy
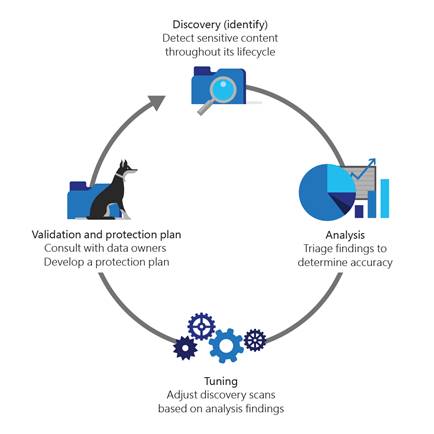
Over the past two years of using the Azure Information Protection scanner, we’ve refined our operational strategy to incorporate an iterative, four-step cycle. This process feeds back on itself to continually improve scan accuracy and efficacy:
- Discovery/identify: When we add a new data source to our scan list, we enter the initial parameters for the files that the Azure Information Protection scanner should search and the keywords to flag, and then provide a report on these initial scan results.
- Analysis: After the initial scans have completed, our analysts review the scan results to determine scan accuracy.
- Tuning: We use the results of the preceding analysis to adjust our discovery scan settings with the intent of improving accuracy and reducing false positives.
- Validation and protection: Finally, we collaborate with the department’s data custodian to develop a protection plan based on regular scans of their on-premises data stores. The data custodian helps determine whether we need Azure Information Protection scanner to apply any labels to files that are found to contain sensitive information—including custom labels for a department’s unique needs, such as Attorney-client confidential for Legal, HIPAA for Human Resources, or SSN in a Sales data store. The data custodian can also identify the circumstances that should prompt the Azure Information Protection scanner to automatically encrypt a file to better protect its sensitive data.
These parameter updates are fed back into the system for future discovery scans, forming a continuous-improvement cycle, as illustrated in the following Figure 2.
Benefits
Following are some of the key benefits that CSEO is experiencing by implementing Azure Information Protection scanner.
- Enhanced functionality: Whereas the third-party products we used focused solely on discovering and reporting on sensitive data, the Azure Information Protection scanner also enables us to automatically apply labels and even encrypt the files if required. Moreover, Azure Information Protection scanner can even scan PDF files and RMS-encrypted documents, if the operator is accredited as an RMS superuser.
- Simplified management processes: With the Azure Information Protection scanner’s new blade in the Azure portal, we have an integrated view with centralized logging of scanner results. This is especially important when managing at scale, as we do at Microsoft. We’re increasing the numbers of scanners as we onboard other departments’ on-premises data stores. The console enables us to see all statuses at once: which scanners are running, and which are offline or idle. Furthermore, the scanners are so efficient with network loads that we can deploy all our scanners to a single location (such as a datacenter in North America) and have them scan on-premises data stores around the globe.
- Consistent scan results across the enterprise: We no longer have to rebuild policies between our cloud scans and the third-party products that we formerly used for on-premises scans. Because Azure Information Protection scanner can reuse Office 365 DLP information types, we can define them once and then use them everywhere.
- Reduced operational costs: Azure Information Protection scanner has significantly reduced our operational costs compared to our previous third-party solution in the following ways:
- No additional licensing fee: Because the Azure Information Protection scanner is included as part of Azure Information Protection, all enterprises that use Azure Information Protection can incorporate Azure Information Protection scanner without incurring any additional licensing fee. Azure Information Protection scanner is a commonsense way to maximize the value of your existing Microsoft 365 investment.
- Reduced administrative overhead: Azure Information Protection scanner’s streamlined management processes, its consolidated management console, and its native integration with all the other Microsoft 365 technologies have vastly streamlined the administrative overhead for our Azure Information Protection personnel. Furthermore, switching to Azure Information Protection scanner from the previous third-party solution has freed us from having to maintain proprietary third-party technologies.
Lessons learned and best practices
CSEO has learned some valuable best practices as we have integrated the Azure Information Protection scanner into our overall data protection strategy:
- Crawl, walk, jog, then run. At Microsoft, we approach onboarding each new on-premises data store with these four steps:
- Crawl: Don’t attempt to scan your company’s entire set of file shares or encrypt files on your first attempt. Instead, focus on discovery first. Use a smaller data repository with a known set of files. At Microsoft, we perform an initial discovery scan to determine what kinds of sensitive information types a new data store might contain. This is when we use Azure Information Protection scanner’s option to discover all sensitive information types without having to configure any labels—a key feature when we need to scan large amounts of disparate data.
- Walk: Review the results of your initial scans with the appropriate data custodian to identify false positives and fine-tune the data store’s search parameters. Select the sensitive information types you’re interested in and then map them to any custom labels that are relevant for the data store. At Microsoft, we iterate on our scan results until they accurately reflect what should be flagged, labeled, and encrypted.
- Jog: After your information types and labels are set correctly, you can elevate your scan actions from simple discovery to programmatically applying labels to the files that need them. You can also change the labels of those files that appear to be incorrect. At Microsoft, depending on the data store and the department’s needs, we can temporarily accredit the SecOps administrator as an RMS superuser to include scans of RMS-encrypted files.
- Run: When you’re comfortable with the efficacy of the labels that are being applied to your data store, work with your data custodian and other stakeholders to determine which files, if any, should be automatically encrypted during subsequent scans.
- Balance the number of scanners you deploy with the amount of data. As you continue to onboard more data stores, monitor the time required to complete the scans, and use this information to identify when another scanner should be brought online. At Microsoft, we’ve learned that the amount of data is the key factor in deciding when to add additional scanners; the terabytes of data being scanned is a more important determinant than the number of files or shares, or their locations.
- Define your sensitive information types in Office 365 DLP, then use them in Azure Information Protection scanner. If you’re already using Office 365 DLP to scan and protect your cloud-based data store, simplify your policy management efforts by creating your scan policies in Office 365 DLP. You then can use this same logic in Azure Information Protection scanner. At Microsoft, we follow this process to streamline operations and to ensure consistency in the labels that we apply across our hybrid environment.
- Partner with your company’s data custodians to onboard additional on-premises data stores. Data owners might be hesitant to provide access to their on-premises data stores. If you’re using Office 365 DLP, begin your conversations by showing scan results from the same department’s cloud stores. Discussing the security issues that you’ve identified in their department’s online files through Office 365 DLP can help the data custodian better understand how the Azure Information Protection scanner provides similar insights and protection for their on-premises data. Collaborating with stakeholders, demonstrating the value that Azure Information Protection scanner can bring to their on-premises data stores, and catering to each department’s unique needs by implementing custom labels are all key to a successful onboarding. Whenever we begin to onboard a new data store at Microsoft, we always consult with data custodians and owners to help identify the most sensitive content that we need to discover, and partner with them throughout our ongoing scan cycles to best protect their sensitive data.
Conclusions
As companies continue to embrace the digital domain, they want to enhance data sharing and data mobility to create new business value. At the same time, organizations also need to better protect their data—and their customers’ and partners’ data—from unauthorized disclosure, modification, or destruction. Protecting data in the enterprise requires a holistic approach, in which all file types and locations are protected equally.
At Microsoft, the Azure Information Protection scanner fits well into our overall identity protection strategy, complementing Office 365 DLP’s cloud-based protection and Azure Information Protection’s automatic labeling of new Office files. As components of Microsoft 365, these technologies collectively offer end-to-end discovery, custom labeling, and automated protection of all sensitive data, irrespective of when the data was created or where it is stored—even in PDFs and RMS-encrypted files.
Our next steps
We’ve successfully onboarded nearly 100 percent of all CSEO-managed on-premises data stores, and we’re now working with other departments and regions to begin onboarding their on-premises data stores. We’re also working closely with the product team, providing ongoing feedback on incorporating new features. Some of the items we’re investigating are:
- Adding the ability to configure scanners through the Azure portal in addition to PowerShell.
- Implementing automated load balancing.
Your next steps
If you’re already using Microsoft 365, use the links below to learn more about how you can enhance your digital security with Azure Information Protection scanner and the other security technologies that are available to you in Microsoft 365.