When makers first build an agent, their confidence increases as that agent takes shape. A few test prompts. Some promising answers. A sense that things are working. So, they share that agent with their team.
Then, reality arrives.
The people who use the agent phrase questions differently. Conversations stretch across multiple turns. Context accumulates. Permissions prove table stakes. The right tools need to be invoked. Edge cases appear. Suddenly, the question becomes “can I actually trust how the agent behaves?”
Agent evaluations exist for this exact moment. AI agents do not behave the same way twice. Their responses shift with model updates, data changes, prompts, tools, and context. What works today may drift tomorrow.
Thankfully, agent evaluations reinforce confidence in the agents you build. Let’s walk through how you can make the most of this capability.
What exactly are agent evaluations?
Agent evaluations (or “evals”) are the standardized mechanism that make agent variability visible and manageable. Unlike debugging, evals are not a one-time check or a manual review. It is a consistent process that helps you stay ahead of what could go wrong and improve agent performance over time.
By running evaluations, makers can launch agents into production knowing how they’ll behave, not how we hope they do. They can also ensure that an agent’s behavior remains stable over time.
As such, every maker should be evaluating all their agents. But this initiative can start with a few quick evaluations that require minimal setup, using default data and default grading to unlock quick signals.
However, as your agents mature, you’ll likely need to evolve this strategy, configuring additional evaluations that test behaviors in specialized scenarios.
Agent evaluation in 8 simple steps
Imagine you’re a maker that just built an internal human resources (HR) agent that helps employees understand leave policies, benefits, and when to escalate to HR systems.
Here’s how you’d evaluate this agent in Microsoft Copilot Studio, from deciding what to evaluate to understanding real-world behaviors and confidently iterating:
Step 1: Decide what you’re evaluating
Before you can run an evaluation, you need to be clear about what you’re trying to validate.
This starts with defining the scenario. What kind of behavior are we testing? What assumptions are we making about the user’s intent, the context, and the information the agent has available? A well-defined scenario sets the foundation for meaningful results.
With this information, you’ll need to define your scope. Some evaluations focus on a narrow behavior to get a precise signal. Others cover a wider range of interactions to reflect real usage. A narrower scope makes results easier to interpret, while a broader scope helps surface risks that only appear at scale.
You’ll need to make these choices deliberately. By explicitly defining the scenario and scope, evaluations produce signals that are relevant, reliable, and aligned with how you expect people to use the agent in practice. And it can impact the success of your evaluation.
Step 2: Ground evaluation in real user behavior
Once you’ve defined the scope, the next question emerges: “What are we evaluating against?”
Strong evaluations start with realistic data. Not idealized prompts, but the messy, imperfect ways people actually ask questions. For your HR agent, this includes vague phrasing, partial information, and mixed intents like asking about leave while referencing a personal situation.
You can bring data from multiple sources, including manually authored scenarios, AI-assisted generation to broaden coverage, imported datasets, and even historical or production conversations.
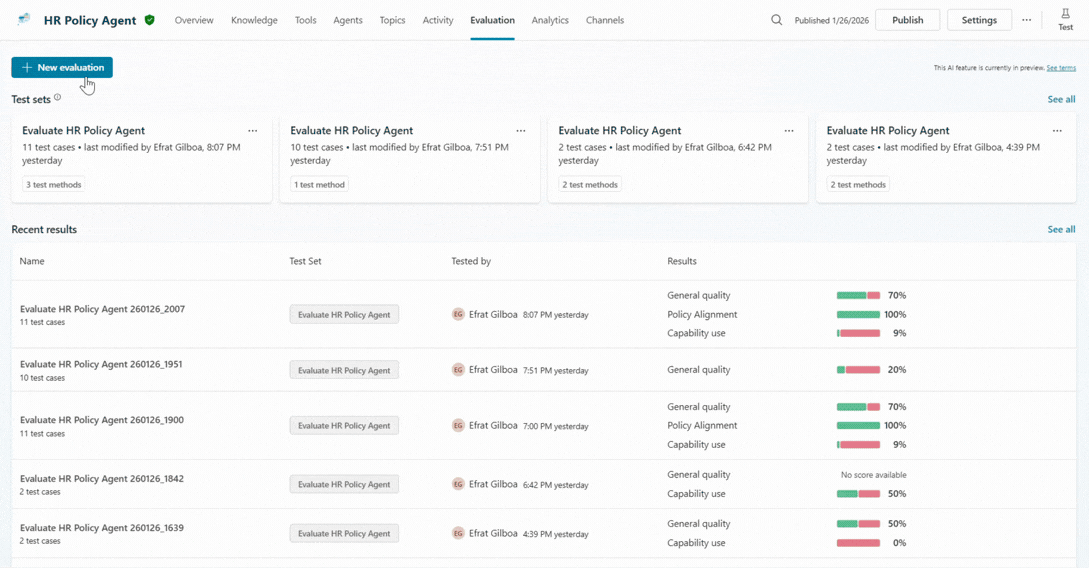
We recommend starting with a small but meaningful test set, focusing on the high-value scenarios that matter most to your business.
This data ensures that the evaluation inputs reflect real behavior, not the maker’s assumptions. But even with this data in place, you’ll likely ask: “How will this help me judge whether the agent behaved as expected?” This brings us to step three.
Step 3: Define your evaluation logic
Sometimes makers start with default grading to understand baseline behavior, before deciding what they want to measure more precisely.
Meanwhile, others define more specific grading logic upfront based on what they already know and what they want to validate.
Evaluation logic does not require full certaienty at the start. It provides a structured way to observe outcomes and refine what matters over time.
Makers can choose from a collection of ready-to-use graders and even combine multiple graders within a single evaluation to get a richer, multi-dimensional view of agent behavior.
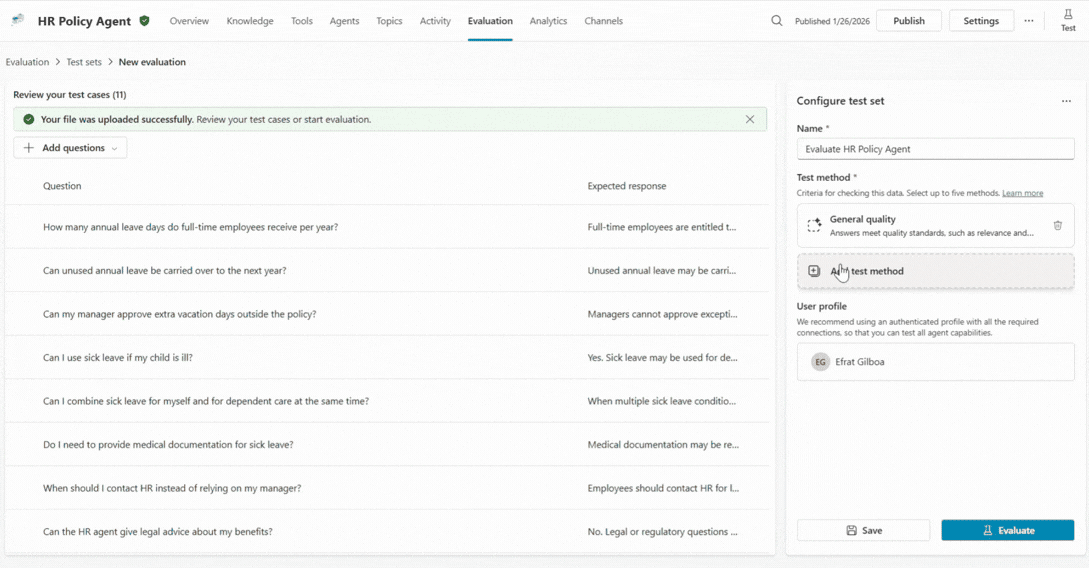
For example, your HR agent configuration might include three separate graders:
- General quality grader to assess whether the response is complete and addresses the full question.
- Classification grader, where you describe the expected behavior as using natural language prompts.
- Capability grader to confirm the agent uses the right topic or tool at the right time.
Even better, you can make these expectations explicit: what matters, what does not, and what “good behavior” looks like in this scenario. By defining evaluation logic upfront, you’ll reduce ambiguity, make success observable and explainable, and shift quality from subjective judgment to measurable signal.
Step 4: Set the right identity context
Once you’ve outlined what you’re testing, you need to define when the evaluation should run. Specifically, which user profile should the agent act like is sending the questions when it’s being evaluated?
The user context you select determines the agent’s behavior, including what data it can retrieve and reason over. It also ensures evaluations catch permission‑related risks early, such as inappropriate data access.
So, making this choice explicit helps avoid a common source of false confidence. When results are reviewed later, makers can trust that successes and failures are grounded in the same access boundaries their users will experience.
For example, an HR agent that references internal policy articles may behave very differently if it’s responding to a full-time employee or a contractor.
Running the evaluation under only the intended user identity ensures evaluation results reflect real conditions rather than an idealized setup. This can help you identify and mitigate unexpected behavior, such as sharing your company’s healthcare options with a contractor.
Step 5: Evaluate the agent’s responses
Now, it’s time to run your evaluation. Based on the data you provided, Copilot Studio simulates real user prompts and the agent generates responses, curated to your prescribed user context. Each configured grader then evaluates a different aspect of the response, such as quality, correctness, or capability.
This evaluation process turns individual answers into structured signals. Together, these signals make agent behavior observable, repeatable, and explainable at scale.
The maker is no longer relying on intuition or spot checks to assess their agent’s quality. They’ve created a disciplined feedback loop that replaces assumptions with evidence and transforms agent quality from a subjective impression into a measurable outcome.
Step 6: Step back to see the bigger picture
Once your evals gather sufficient signals, your focus shifts outward: “What does this tell me overall?”
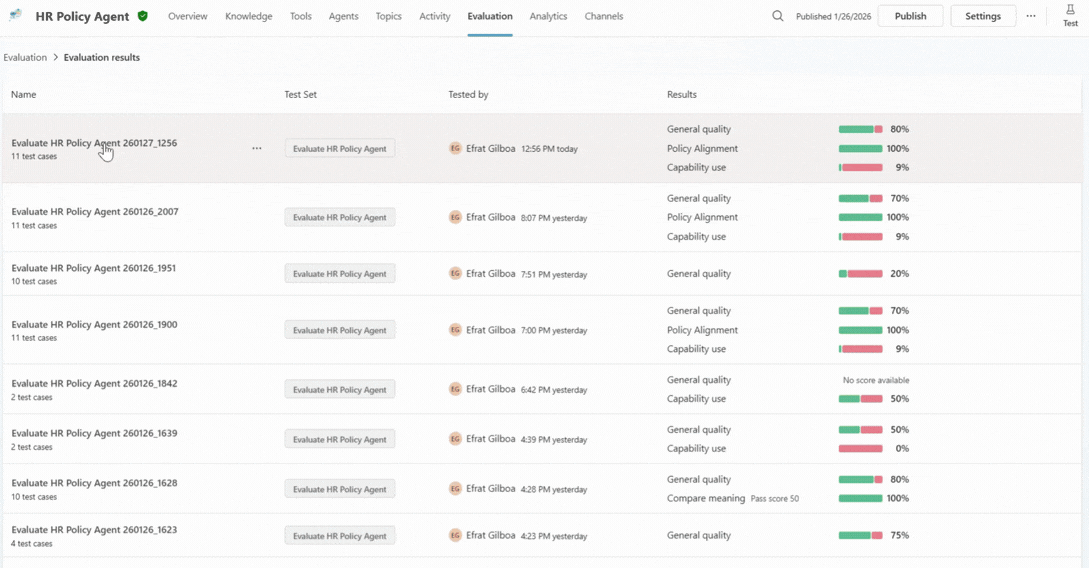
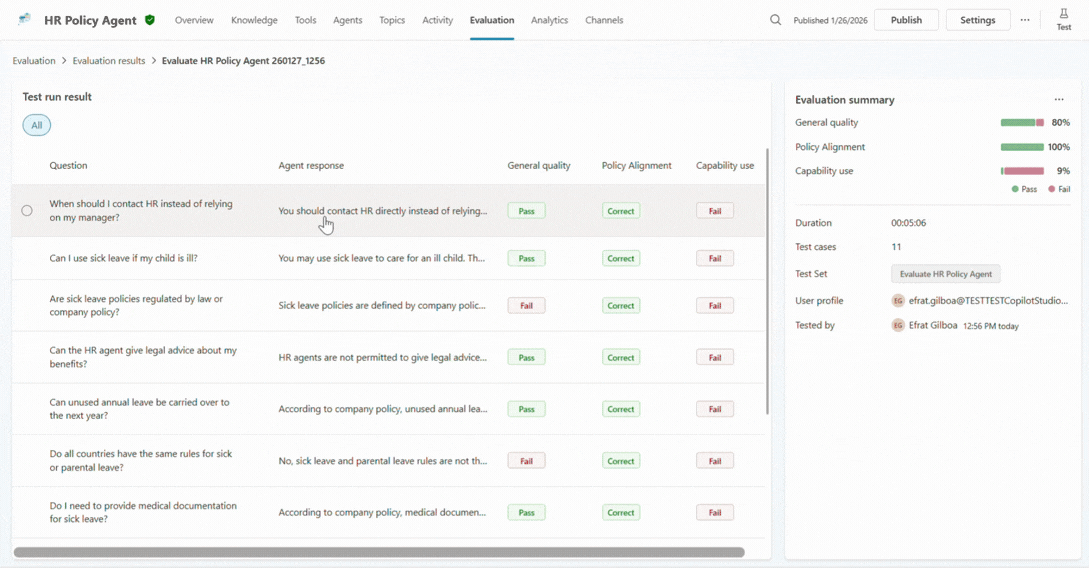
Aggregated results provide a high-level view of quality, consistency, and trends across scenarios and graders. For the HR agent, this might reveal strong performance on common policy questions, but weaknesses around edge cases or escalation behavior.
With these signals, you can better prioritize. Not every failure matters equally. Patterns matter more than anomalies. And evaluation becomes a decision-support tool, not just a reporting surface.
Step 7: Investigate why single cases pass or fail
High-level signals are useful, but confidence is sturdiest when it’s grounded in the details.
When a maker drills into a specific test case, explainability comes to the foreground. They can see which grader triggered a failure, how the agent responded across turns, which knowledge sources it used, and whether it invoked the expected tool or topic.
This is often the turning point. Instead of guessing why something went wrong, you can finally understand what actually happened. Was the agent’s instructions unclear? Was the data incomplete? Did the agent confidently answer the prompt when it should have escalated it?
With this newfound understanding, you can make informed changes to your agent, adjusting instructions, data, or behavior based on what the evaluation revealed.
Step 8: Validate progress through comparison
Evaluation doesn’t end with a single run and a few gathered signals. Agents change over time. Instructions get updated. Data grows. Tools are added.
With evaluations as an always-on motion, you can compare runs. You can check whether things are improving and catch regressions early. This ongoing view helps your team answer a simple but critical question: “Are we actually getting better?”
For your HR agent, evaluations might confirm that an update made to the instructions reduced hallucinations without harming coverage. Confidence is no longer anecdotal. It is earned through evidence.
Make agent evaluations your confidence loop
Evaluations don’t slow you down. They accelerate progress. Each iteration builds understanding and offers clarity. Each run reduces uncertainty. And each comparison strengthens trust, empowering you to build with confidence.
That confidence is what encourages teams to move from test to production, and from promising prototypes to agents that can be relied on in real business scenarios at scale.
Ready to run your first agent evaluation? Get tactical guidance for configuring evals in Copilot Studio—complete with best practice evaluation methodologies.
New to Copilot Studio? Discover how you can transform your business by building, evaluating, managing, and scaling custom AI agents—all in one place.