As Microsoft alongside our industry partners and the security community continues to investigate the extent of the Solorigate attack, our goal is to provide the latest threat intelligence including IOCs and guidance across our products and solutions to help the community fight back against, harden your infrastructure, and begin to recover from this attack of unprecedented scale. As new information becomes available, we will make updates to this article.
This blog will outline lessons learned from this and other incident response to date in on-premises and cloud environments. This latest guidance is for customers looking to re-establish trusted identities for credentials that are suspected of compromise by Solorigate malware.
This article is intended to give experienced incident responders some advice on techniques to consider when helping an organization respond to a suspected systemic identity compromise, like we’re seeing in some victims of the Solorigate malware, based on our experience in the field in similar scenarios. Re-establishing trust in the organization’s on-premises and cloud environments with minimal business impact requires in-depth investigation and an understanding of potential methods of persistence. While not meant to cover every possible scenario, this guidance is intended to summarize our experience with similar customer breaches and will be updated if we learn of new information that would help with successful recovery. Please review the resources referenced at the end of this article for additional information. This information is provided as-is and constitutes generalized guidance; the ultimate determination about how to apply this guidance to your IT environment and tenant(s) must consider your unique environment and needs, which each Customer is in the best position to determine.
The Solorigate investigation referenced in this guidance is ongoing at the time of publication and our teams continue to act as first responders to these attacks. As new information becomes available, we will make updates through our Microsoft Security Response Center (MSRC) blog.
Overview of the intrusion
As described in this Microsoft blog post, the hallmarks of this actor’s activity include, but are not limited to, the following techniques that are likely to result in systemic identity compromise:
- An intrusion through malicious code in the SolarWinds Orion product. This results in the attacker gaining a foothold in the network, which the attacker can use to gain elevated credentials. Microsoft Defender now has detections for these files. Read our in-depth technical analysis of the Solorigate malware.
- An intruder using administrative permissions (acquired through an on-premises compromise) to gain access to an organization’s trusted SAML token-signing certificate. This enables them to forge SAML tokens to impersonate any of the organization’s existing users and accounts, including highly privileged accounts.
- Anomalous logins using the SAML tokens signed with a compromised token-signing certificate, which can be used against any on-premises resources (regardless of identity system or vendor) as well as against any cloud environment (regardless of vendor) because they have been configured to trust the certificate. An organization may miss the use of illegitimate SAML tokens because they are signed with a legitimate certificate.
- The use of highly privileged accounts (acquired through the technique above or other means) to add illegitimate credentials to existing application service principals, enabling the attacker to call APIs with the permission assigned to that application.
Overview of response objectives
Organizations that have experienced systemic identity compromise need to start recovery by re-establishing trustworthy communications. This will enable effective triage and coordination of business operations recovery.
Many organizations have complex internal and external interdependencies. Core business processes and applications in an organization are likely to be temporarily impacted during recovery efforts until trust within your environment is re-established. Microsoft recommends that Incident Responders establish secure communications with key organizational personnel as the first step toward organizational recovery. If your investigation indicates that the attacker has used techniques outside of identity compromise at lower levels of your organizations’ infrastructure, such as hardware or firmware attacks, you will need to address those threats to reduce the risk of re-compromise.
Response objectives in approximate order:
- Establish secure communications for personnel key to the investigation and response effort.
- Investigate the environment for persistence and initial access point, while establishing continuous monitoring operations during recovery efforts.
- Regain and retain administrative control of your environment and remediate or block possible persistence techniques and initial access exploits.
- Improve posture by enabling security features and capabilities following best practice recommendations.
We recommend that incident responders review and digest the entirety of this guidance before taking action, as the specific order of actions taken to achieve the response objectives is very situational and depends heavily on the results (and completeness) of investigation and the business constraints of the specific organization. The following sections describe the incident Response techniques we recommend you consider for each of the above objectives.
Establish secure communications and productivity
Successful response requires being able to communicate without the attacker eavesdropping on your communications. Until you have achieved assurance in the privacy of your communications on your current infrastructure, use completely isolated identities and communication resources to coordinate your response and discuss topics that could potentially tip off the attacker to your investigation. Until your investigation has achieved assurance in actor eviction, we strongly recommend that you keep all incident-related comms isolated to enable you to have the element of surprise when taking remediation actions.
- Initial one-on-one and group communications can be achieved through phone (PSTN) calling, conference bridges not connected to the corporate infrastructure, and end-to-end encrypted messaging solutions.
- One way that many customers have established secure productivity and collaboration is to create a new Office 365 tenant which is completely isolated from the organization’s production tenant and create accounts only for the key personnel needed, and any incident response vendors or partners who need to be part of the response.
- Make sure to follow best practices for securing this tenant, especially administrative accounts and rights by default. The new tenant should be limited on Administrative rights along with no trusts with outside applications or vendors. If you need further assistance or want information on hardening Microsoft 365, you can review the guidance here.
Investigate your environment
Once your incident responders and key personnel have a secure place to collaborate, the next step is to investigate the suspected compromised environment. Successful investigation will be a balance between getting to the bottom of every anomalous behavior to fully scope the extent of attacker activity and persistence and taking action quickly to stop any further activity on objectives by the attacker. Successful remediation requires as complete an understanding of the initial method of entry and persistence mechanisms controlled by the attacker as possible. Any persistence mechanisms missed could result in continued access by the attacker and potential for re-compromise.
- Investigate and review cloud environment logs for suspicious actions and attacker IOCs, including:
- Unified Audit Logs (UAL).
- Azure Active Directory (Azure AD) logs.
- Active Directory logs.
- Exchange on-prem logs.
- VPN logs.
- Engineering systems logging.
- Antivirus and endpoint detection logging.
- Review endpoint audit logs for changes from on-premises for actions including, but not limited to, the following:
- Group membership changes.
- New user account creation.
- Delegations within Active Directory.
- Along with other typical signs of compromise or activity.
- Review Administrative rights in your environments
- Review privileged access in the cloud and remove any unnecessary permissions. Implement Privileged Identity Management (PIM); setup Conditional Access policies to limit administrative access during hardening.
- Review privileged access on-premise and remove unnecessary permissions. Reduce membership of built-in groups, verify Active Directory delegations, harden Tier 0 environment, and limit who has access to Tier 0 assets.
- Review all Enterprise Applications for delegated permissions and consent grants that allow (sample script to assist):
- Modification of privileged users and roles.
- Reading or accessing all mailboxes.
- Sending or forwarding email on behalf of other users.
- Accessing all OneDrive or SharePoint sites content.
- Adding service principals that can read/write to the Directory.
- Review access and configuration settings for the following Office 365 products:
- SharePoint Online Sharing
- Teams
- PowerApps
- OneDrive for Business
- Review user accounts
- Review and remove guest users that are no longer needed.
- Review email configurations using Hawk or something similar.
- Delegates
- Mailbox folder permissions
- ActiveSync mobile device registrations
- Inbox Rules
- Outlook on the Web Options
- Validate that both MFA and self-service password reset (SSPR) contact information for all users is correct.
You may find that one or more of the logging sources above are data sources that the organization does not currently include in its security program. Some of them, especially the logging available in the cloud, are available only if configured and we recommend that you configure them as soon as possible to enable both the detections in the next section and forensics review of logs going forward. Make sure to configure your log retention to support your organization’s investigation goals going forward and retain evidence, if needed for legal, regulatory, or insurance purposes.
Establish continuous monitoring
There are many ways to detect activity associated with this campaign. Exactly how your organization will detect attacker behavior depends on which security tools you have available, or choose to deploy in response. Microsoft has provided examples publicly for some of the core security products and services that we offer and are continually updating those documents as new threat intelligence is identified related to this attacker. If you use other vendor’s products, review your vendor’s recommendations, and review the Microsoft documentation below to understand the detection techniques if you need to implement analogous detections in your environment on your own.
For readers using Azure Sentinel in their environments, review SolarWinds Post-Compromise Hunting guidance.
For readers using Microsoft Defender for Endpoint, review our guidance here, and review Microsoft Defender Antivirus guidance.
Azure Active Directory sign-ins
You can view this information from the Azure Active Directory Sign-in blade by selecting an appropriate time window and then downloading the report as either a CSV or JSON file. NOTE: You can download interactive, as well as non-interactive, sign-in reports via this interface. Once you have downloaded the results, look for the value “MFA requirement satisfied by claim in the token” in the “MFA result” field.
You can also use the Get-AzureADAuditSignInLogs cmdlet (see the details here) and filter the results to only return entries that match this field value, as seen in this example:
Get-AzureADAuditSignInLogs -All:$true -Filter "createdDateTime gt and createdDateTime lt " | where {$_.Status.AdditionalDetails -eq "MFA requirement satisfied by claim in the token"} | select-object CreatedDateTime, IpAddress,UserAgent, ResourceDisplayName, CorrelationId, RequestId, UserPrincipalName -ExpandProperty Status
If your ADFS environment is configured to send a claim for MFA being satisfied, this may not be a strong signal. However, for many organizations using ADFS, and this claim is not included per your configuration; in those cases, the presence of this claim may be a strong indicator of attacker activity. You may also wish to add additional filters or conditions in the where clause to further improve your signal to noise ratio, such as only surfacing results from domains that are federated.
If suspicious sign-ins are detected, you can further pivot your investigation based on IP addresses identified, user accounts identified, and/or other indicators such as the UserAgent string and client operating system observed, if based on your knowledge of your environment these appear to be strong indicators.
Analysis of risky sign-in events
In some cases, Azure Active Directory and its Identity Protection platform will generate risk events associated with the use of attacker generated SAML tokens. These can be labeled as “unfamiliar properties”, “anonymous IP address”, “impossible travel” and the other risk events as described here.
Closely analyze all risk events associated with accounts that have administrative privileges. It is also important to analyze events that have been dismissed or remediated as some of these actions are done automatically. For example, a risk event for an anonymous IP address can be automatically remediated because the user passed MFA.
Detection of domain authentication properties
The attacker may attempt to manipulate the domain authentication policies which are recorded in the Azure Active Directory Audit Logs and reflected in the Unified Audit Log. An attacker who has gained access with Global Administrator privileges can modify the domains that are federated and/or trusted. Review any events associated with “Set domain authentication” in either the Unified Audit Log, Azure AD Audit Logs, and/or your SIEM environment. Verify that all activities were expected and planned.
The sample command below returns the entries from the Unified Audit Log which were associated with manipulation of domain authentication settings.
Search-UnifiedAuditLog -StartDate -EndDate -ResultSize 5000 -Operations "Set domain authentication"
Detection of credentials to a service principal associated with an OAuth application
If the attacker has gained control of a credential with sufficient privileges, the attack pattern includes locating an application that has been granted the ability to access any user’s e-mail in the organization and adding attacker controlled credentials to that application. In some cases, the attacker has modified these applications granting them additional rights such as access to all e-mail in the organization.
The following are operations that would be consistent with attacker behavior:
- Add service principal credentials.
- Update application- certificates and secrets management.
- Update service principal.
- Add app role assignment to service principal.
- Add app role assignment grant to user.
- Add OAuth2PermissionGrant.
Detection e-mail access by applications
Detection of access to e-mail by applications can be achieved using the Advanced Auditing capabilities of Office 365. Access to messages inside of Office 365 is audited via the MailItemsAccessed capability.
Analyze events in the Unified Audit Log for the Operation of MailItemsAccessed.
Detection of non-interactive sign-ins to service principals
Azure Active Directory in the Sign-In reports provides reporting of non-interactive sign-ins using credentials issued to service principals (as was observed in this attack). Analyzing the sign-ins for service principals reports can provide valuable data such as the IP Address the attacker was using to access the applications for e-mail access.
If there is evidence found that uncovers administrative permissions acquired through the on-premises compromise to gain access to your organization’s global administrator account and/or trusted SAML token signing certificate, Microsoft recommends taking the following immediate actions:
Remediate and retain administrative control
Regaining and retaining administrative control of your environment
If your investigation has identified that the attacker has administrative control in the organization’s cloud environment and/or on-prem, it’s critical to regain control in such a way as to ensure that the attacker isn’t persistent. Exactly which steps you will take depend both on what persistence you discovered in your investigation, and your level of confidence in the completeness of that investigation and discovery of all possible methods of entry and persistence. While it is possible to regain control with high confidence, even in the face of an incomplete investigation, doing so requires significant impact to business operations, so most organizations choose to remediate based on the results of the investigation in our experience.
We recommend you consider the following steps when building your administrative control recovery plan, but the exact order and timing should be planned based on the results of your investigation and understanding of adversary owned administrative assets and methods of persistence.
- Ensure that any actions described here are performed from a trusted device built from a clean source, such as a privileged access workstation.
- If the organization has lost control of its token signing certificates or federated trust the highest assurance approach is to remove trust and switch to cloud mastered identity while remediating on-prem. A detailed plan for doing so is beyond the scope of this document and requires careful planning and understanding of the business operations impacts of isolating identity. Review the Azure Active Directory guidance or key considerations.
- Should your organization choose not to break trust while recovering administrative control on-prem, you’ll need to rotate your SAML token signing certificate once you have regained administrative control on-prem and blocked the attacker’s ability to access the signing certificate again. It’s critical that your organization follow the certificate rotation instructions below to ensure that the attacker doesn’t maintain the ability to forge tokens for your domain.
Rotation of ADFS token signing certificate
For a compromised or potentially compromised ADFS Token Signing certificate, rotating the Token Signing certificate a single time would still allow the previous Token Signing certificate to work. The rationale for this is to permit a grace period to update your Relying Party Trusts prior to expiration of the certificate during normal rotation of the signing certificate.
NOTE: Conducting the below steps in the ADFS environment will create both a primary and secondary certificate and will automatically promote the secondary certificate to primary after a default period of five days. If you have Relying Party trusts, this could cause impacts five days after the initial ADFS environment change and should be accounted for within your process. You can resolve this by replacing the primary certificate a third time with “-Urgent” and removing the secondary certificate or turning off automatic certificate rotation.
If instead of rolling the Token Signing Certificate your organization feels the need to replace the ADFS servers with known clean systems, you can follow steps to remove the existing ADFS from your environment and build a new one.
Delete Azure AD Cloud Provisioning agent configuration.
Should your organization decide to rotate the certificate on your current ADFS servers, follow these steps in the below order, from the ADFS server:
- Check to make sure that your AutoCertificateRollover is set to True.Get-AdfsProperties | FL AutoCert*, Certificate*
- If it is not, you can set it with this command:Set-ADFSProperties -AutoCertificateRollover $true
- Connect to the Microsoft Online ServiceConnect-MsolService
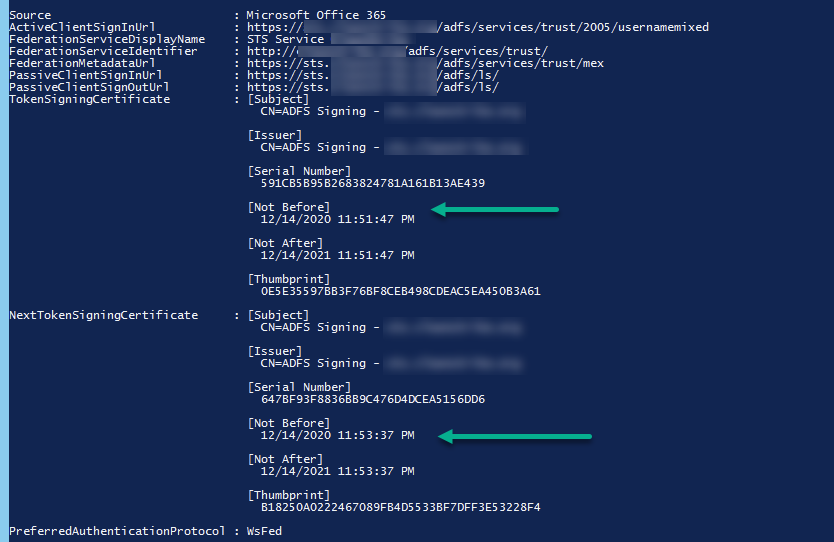
- Document both your on-premise and cloud Token Signing Certificate thumbprint and expiration dates.Get-MsolFederationProperty -DomainName <domain>

- Replace the primary Token Signing certificate using the -Urgent switch to cause ADFS to replace the primary certificate immediately without making it a Secondary certificate.Update-AdfsCertificate -CertificateType Token-Signing -Urgent
- Create a secondary Token Signing certificate without using the -Urgent switch to allow for two on-premise Token Signing certificates, before syncing with Azure cloud.Update-AdfsCertificate -CertificateType Token-Signing

- Update the cloud environment with both the primary and secondary certificates on-premise to immediately remove the cloud published token signing certificate. If this step is not completed using this method you leave the potential for the old token signing certificate to still authenticate users.Update-MsolFederatedDomain -DomainName <domain>

- Verification that you completed the above steps and removed the certificate that was displayed in Step 3 above.Get-MsolFederationProperty -DomainName <domain>
- Revoke refresh tokens via PowerShell, information can be found here and you can also reference how to “Revoke user access in Azure Active Directory.”
- Note: This will log users out of their phone, current webmail sessions, along with other items that are using Tokens and Refresh Tokens.
Additional cloud remediation activities to complete
- Reset passwords on any break-glass accounts and reduce the number of break-glass accounts to the absolute minimum required.
- We recommend that service and user accounts with Privileged access should be Cloud Only accounts and not use on-premise accounts synced or federated to Azure Active Directory.
- Enforce Multi-Factor Authentication (MFA) across all elevated users in the tenant. We recommend enforcing MFA across all users in the tenant.
- Implement Privileged Identity Management (PIM) and conditional access to limit administrative access.
- For Office 365 users, implement Privileged Access Management (PAM) to limit access to sensitive capabilities (including eDiscovery, Global Admin, Account Administration, and more).
- Review and reduce all Enterprise Applications delegated permissions or consent grants that allow such as:
- Modification of privileged users and roles.
- Reading, sending email, or accessing all mailboxes.
- Accessing OneDrive, Teams, or SharePoint content.
- Adding of Service Principals that can read/write to the Directory.
- Application Permissions versus Delegated Access.
Additional on-premises remediation activities to complete
- Rebuild systems that were identified as compromised by the attacker during your investigation.
- Remove unnecessary members from Domain Admins, Backup Operators, and Enterprise Admin groups. Reference Microsoft’s Securing Privileged Access.
- Reset passwords of all privileged accounts in the environment.
- Privilege accounts are not limited to Built-In groups but can also be groups that are delegated access to Server Administration / Workstation Administration and other aspects of your environment.
- Reset the krbtgt account using this script twice.
- Note: If you are using Read-Only Domain Controllers, you will need to run the script for Read-Write Domain Controllers and Read-Only Domain Controllers.
- After you validate that no persistence mechanisms created by the attacker exist or remain on your system, schedule a restart. This can assist with removing memory resident malware.
- Reset each domain controller’s DSRM (Directory Services Restore Mode) password to something unique and complex.
Remediate or block persistence discovered during investigation
Remediate the persistence techniques identified in your investigation stage earlier. Investigation is an iterative process and you’ll need to balance the organizational desire to remediate as you identify anomalies and the chance that remediation will alert the attacker of your detection and cause them to react by changing techniques or creating additional persistence. For Office 365 accounts, automatically remediate known persistence techniques, if any are discovered, using the scripts described
Remediate user and service account access
Some of the user-level actions we recommend were described above already, specifically in terms of ensuring that MFA is enabled and running specific remediation scripts to clean up known persistence techniques. Here are some additional steps you should consider taking to remediate and restore user accounts:
- Enforce conditional access based on trusted device.
- If possible, enforce location-based conditional access that suits your organizational requirements.
- For any user accounts suspected of being compromised, immediately reset passwords after eviction; make sure you also implement a mid-term plan to reset credentials for all accounts in your directory.
- After credential rotation, use PowerShell to revoke refresh tokens immediately. More information can be found here and additional resources can be found at Revoke user access in an emergency in Azure Active Directory | Microsoft Docs.
Improve security posture
After a security event is a good time for organizations to reflect on their security strategy and priorities. Incident Responders are often asked to provide recommendations after an event on what investments the organization should prioritize now that it’s been faced with new threats. In addition to the recommendations documented earlier, we recommend you consider these areas of focus for your post-incident review recommendations that are responsive to the post-exploitation techniques used by this attacker and the common security posture gaps that enable them.
General security posture
- Review Microsoft Secure Score for security fundamentals recommendations customized for the Microsoft products and services you consume.
- Ensure that your organization has EDR and SIEM solutions in place.
- Review Microsoft’s Enterprise access model.
Identity
- Review Five steps to securing your identity infrastructure and prioritize steps as appropriate for your Identity architecture.
- Consider migrating to Azure AD Security Defaults for your authentication policy- details can be found here.
- Eliminate your organization’s use of legacy authentication, if systems or applications still require it- review the guidance here.
- As announced last year, the Exchange Team is planning to disable Basic Authentication for the EAS, EWS, POP, IMAP, and RPS protocols in the second half of 2021. As a point of clarity, Security Defaults and Authentication Policies are separate but provide complementary features. We recommend that customers use Authentication Policies to turn off Basic Authentication for a subset of Exchange Online protocols or to gradually turn off Basic Authentication across a large organization. While more details will come in future announcements, as mentioned in April, we plan to begin disabling Basic Authentication in existing tenants with no recorded usage as early as October 2020. We will provide notifications via Message Center posts before we disable Basic Authentication for any tenant.
- In order to help protect your ADFS/Azure AD Connect systems, beyond the ADFS guidance located, we recommend that you consider the following actions:
- Treat your ADFS infrastructure and AD Connect infrastructure as a Tier 0 asset.
- Restrict local administrative access to the system, including the account that is used to run the ADFS service.
- The least privilege necessary for the account running ADFS is the Log on as a Service User Right Assignment.
- Restrict administrative access to limited users and from limited IP address ranges by leveraging Windows Firewall policies for Remote Desktop.
- It is recommended to set up a Tier 0 jump box or equivalent system.
- Block all inbound SMB access to the systems from anywhere in the environment. See this resource for further details.
- Get the Windows Firewall logs to a SIEM for historical and proactive monitoring.
- If you are using a Service Account and your environment supports it, migrate from a Service Account to a group Managed Service Account (gMSA). If you cannot move to a gMSA, rotate the password on the Service Account to a complex password.
- Ensure Verbose logging is enabled on your ADFS systems by executing the following commands:
Set-AdfsProperties -AuditLevel verbose
Restart-Service -Name adfssrv
Auditpol.exe /set /subcategory:”Application Generated” /failure:enable /success:enable
- Implement Sysmon in the environment using a configuration found here.
Contributors: We thank the team at FireEye for their contributions and review.